
Table of Contents
- What Are Emergency Sanitation Kits for Home?
- Best Emergency Hygiene Supplies to Include
- DIY Emergency Toilet Ideas for Disaster Preparedness
- How to Dispose of Human Waste in an Emergency
- Emergency Water Storage Requirements for Sanitation
- Pre-Made vs. DIY Emergency Sanitation Kits
- Customizing Sanitation Kits for Your Family and Regional Hazards
- Maintenance and Rotation Schedule for Sanitation Supplies
- Psychological Preparedness and Sanitation Planning
- Conclusion
Last Updated: July 11, 2026
What Are Emergency Sanitation Kits for Home?
When disaster strikes, utilities fail within hours. Water stops flowing, sewage systems back up, and basic sanitation becomes a critical survival issue that most households completely overlook. Emergency sanitation kits for home are curated collections of supplies designed to manage human waste and maintain hygiene when municipal systems fail. At SHTF Prepper Club, we've found that families who assemble these kits early face far fewer health crises during extended outages.
Unlike general emergency kits focused on food and water, sanitation kits address a specific gap: what happens when you can't flush a toilet for days or weeks. According to research from the CDC emergency preparedness guidelines, waterborne disease outbreaks spike dramatically in the first 72 hours after infrastructure failure, and most cases trace directly to poor sanitation practices. A proper emergency sanitation kit prevents this entirely.
The core components include waste containment supplies, personal hygiene essentials, and disposal methods that work without plumbing. These aren't luxury items, they're the difference between maintaining basic dignity and facing serious illness. The best kits balance practical effectiveness with realistic shelf life, so supplies remain usable for years without constant rotation.
Most guides treat sanitation as an afterthought. That's the mistake. When you're sheltering in place during a water main break or extended power outage, sanitation becomes your primary concern within 24 hours. Everything else, food, entertainment, communication, becomes secondary to managing waste safely.
Best Emergency Hygiene Supplies to Include
The hygiene component of emergency sanitation kits for home prevents disease transmission and maintains psychological well-being during crisis situations. A breakdown in basic hygiene creates cascading health problems: skin infections, respiratory illness, gastrointestinal disease. These complications kill people in disaster scenarios far more often than the initial emergency itself.
Personal Hygiene Essentials
Hand washing remains the single most effective disease prevention method, yet it's the first thing that fails without running water. Your kit needs at least 2-3 gallons of potable water reserved specifically for hygiene during a 72-hour shelter-in-place scenario. This is separate from drinking water, many families make the critical mistake of counting the same supply twice.
Antibacterial hand wipes provide immediate cleaning when water is unavailable. Include at least 100 individual packets for a family of four, one per hand washing opportunity throughout a three-day period. Unscented options work best because fragrance masks contamination and creates false confidence in cleanliness.
Soap bars outlast liquid soap in storage and don't require water to be effective. Dry soap can remove visible contamination from hands before water washing. Include at least four bars per person. Store them in sealed bags to prevent moisture absorption and degradation.
Toilet paper represents a non-negotiable supply that runs out faster than families expect. Standard estimates suggest 50 sheets per person daily, but stress and dietary changes during emergencies increase usage. Store at least 500 sheets per person, roughly 10 rolls for a family of four. Biodegradable options break down faster if you're using alternative waste systems.
Feminine hygiene products deserve specific attention because standard emergency guides often omit them entirely. Women require twice the supply they'd normally use during crisis periods due to stress-related cycle changes. Store at least 50 pads or tampons per menstruating household member.
Toothbrushes and toothpaste prevent dental infections that become serious without access to dentistry. Include one toothbrush per family member plus two backups. Toothpaste tubes last six months with normal use, so rotate stock annually.
Waste Management Supplies
Trash bags rated for human waste differ from standard garbage bags, they're thicker and designed to contain odor and prevent seepage. Include heavy-duty 55-gallon bags specifically for waste containment. Standard kitchen trash bags fail catastrophically when filled with human waste and create biohazard situations.
Enzyme-based waste treatment powder accelerates decomposition and controls odor in alternative toilet systems. Products containing beneficial bacteria break down waste safely over time. Include at least 20 pounds for a family of four during a 30-day supply period.
Lime powder (calcium hydroxide) provides an alternative to enzyme treatments, creating an alkaline environment that kills pathogens. Use 2-3 tablespoons per waste deposit. Store in sealed containers, lime absorbs moisture and becomes ineffective when exposed to humidity.
Disinfectant wipes eliminate surface contamination in waste handling areas. Include 200+ wipes specifically for cleaning toilet seats, bucket rims, and hand contact surfaces. Bleach-based wipes work best but degrade quickly once opened, so purchase fresh supplies annually.
Disposable gloves protect hands during waste handling and cleanup. Include at least 100 pairs, more than families initially estimate. Nitrile gloves resist tearing better than latex and store longer without degradation.
| Supply | Quantity per 4 People | Duration | Storage Notes |
|---|---|---|---|
| Heavy-duty trash bags (55-gal) | 40 bags | 30 days | Keep sealed, away from heat |
| Enzyme treatment powder | 20 lbs | 30 days | Replace annually, store dry |
| Disinfectant wipes | 200+ count | 30 days | Check expiration quarterly |
| Disposable gloves (nitrile) | 100 pairs | 30 days | Replace if brittle or cracked |
| Hand sanitizer (70% alcohol) | 2 bottles | 30 days | Expires after 2 years |
DIY Emergency Toilet Ideas for Disaster Preparedness
The moment water stops flowing, conventional toilets become unusable. A single unflushed toilet creates a biohazard within hours and forces families into increasingly desperate and unsanitary solutions. DIY emergency toilet systems prevent this entirely and cost far less than purchasing pre-made alternatives.
5-Gallon Bucket Toilet System
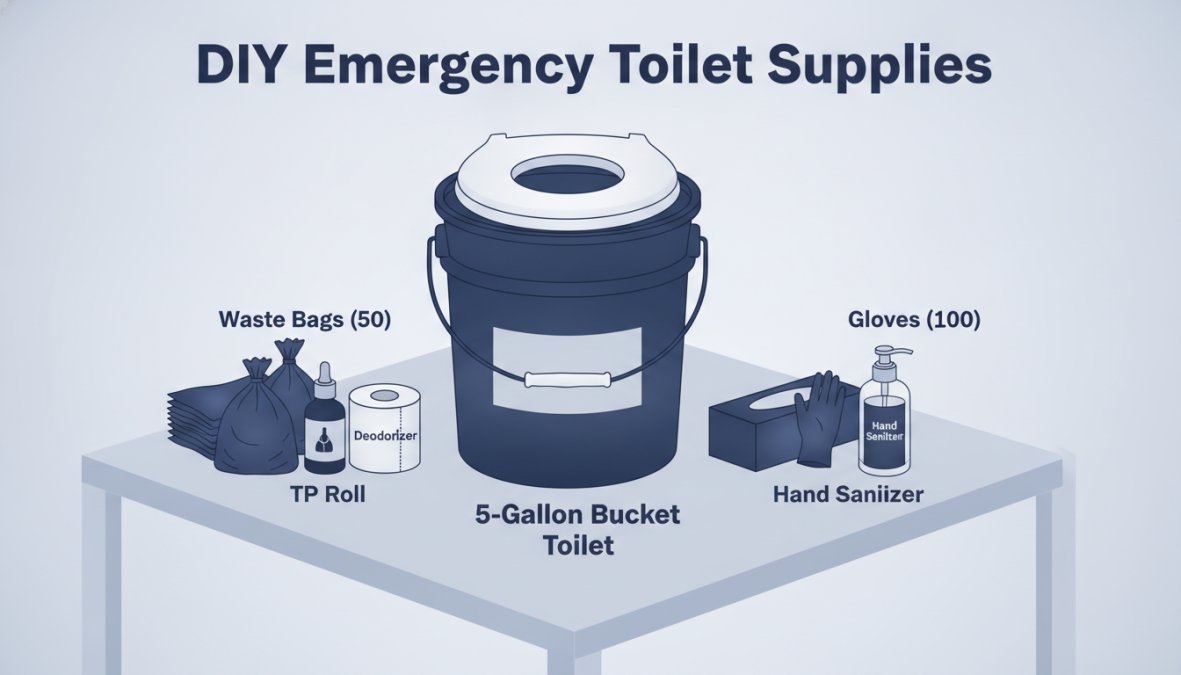
The 5-gallon bucket toilet represents the most practical DIY solution for most households. This system requires a standard food-grade bucket, a toilet seat adapter that costs under $30, and waste treatment supplies. The bucket sits on a sturdy frame or in a closet, creating a functional toilet that works identically to a standard toilet from the user's perspective.
Assembly takes 15 minutes. Purchase a 5-gallon food-grade bucket, never use buckets that previously contained chemicals or non-food items. Attach a toilet seat adapter designed for 5-gallon buckets (these are widely available and fit standard toilet seats). Line the bucket with a heavy-duty trash bag before each use.
Each use requires 2-3 tablespoons of enzyme treatment powder or lime powder added immediately after use. This step prevents odor and begins waste decomposition. Close the bucket lid tightly between uses. The sealed container prevents odor escape and disease vector attraction.
Disposal requires a secure location away from living spaces. Bury waste in a designated pit at least 200 feet from any water source if you have yard space. For apartment dwellers or those without yard access, sealed buckets can be stored in a garage or shed for several weeks before disposal becomes problematic.
The system handles 4-5 uses per bucket before requiring a new liner. A family of four generates roughly 20-24 uses daily, so plan for 5-6 buckets in rotation. This seems excessive until you're actually managing waste without plumbing, then it becomes obviously necessary.
Portable Camping Toilet Options
Commercial portable camping toilets offer a pre-engineered alternative to DIY bucket systems. These units feature built-in waste tanks, lids that seal completely, and chemical treatment systems. Models range from basic 5-gallon capacity units to larger systems holding 20+ gallons.
The advantage of commercial portable toilets is psychological comfort, they feel more like actual toilets, which encourages consistent use. Families are more likely to maintain proper sanitation practices when the system feels normal. This matters more than people expect during crisis situations.
The primary disadvantage is cost and storage space. Quality portable toilets start at $150-300 and require dedicated storage locations. The chemical treatment fluids cost $15-25 per refill and must be purchased before emergencies occur. Many families underestimate ongoing supply costs and find themselves without treatment chemicals mid-crisis.
Portable camping toilets work best as supplements to bucket systems, not replacements. Use the commercial unit for primary bathroom needs and keep bucket systems as backup. This approach balances comfort with practical redundancy, if one system fails, you have alternatives.
How to Dispose of Human Waste in an Emergency
Improper waste disposal creates disease epidemics faster than any other factor in disaster scenarios. According to WHO emergency sanitation standards, inadequate waste management causes cholera, dysentery, and typhoid outbreaks within 5-7 days of infrastructure failure. Proper disposal prevents these catastrophic outcomes entirely.
Safe Containment and Sealing Methods
The first containment principle: separate human waste from living spaces immediately. Never store waste indoors longer than 24 hours. The bacterial load in human waste doubles every 20 minutes at room temperature, creating exponentially increasing disease risk.
Sealed containers prevent odor escape and disease vector attraction. Heavy-duty trash bags rated for hazardous waste provide the most practical containment for bucket systems. Double-bag waste for additional protection, place the sealed bag from the bucket into a second sealed bag before storage.
Lime powder accelerates pathogen death and controls odor simultaneously. Add 2-3 tablespoons per use in bucket systems. Lime works through chemical reaction, not bacterial action, so it functions even when enzyme treatments fail or expire. This makes lime the most reliable backup option.
Enzyme-based treatments contain beneficial bacteria that break down organic matter. These products work slower than lime but create no toxic byproducts. Enzyme treatments work best in temperatures above 50°F, they become ineffective in cold climates without supplemental heat.
Sealed storage containers protect waste from weather and animal access. Use opaque containers to prevent visual contamination stress, families maintain better sanitation practices when they don't see accumulated waste. Store containers in a designated area away from water sources and food storage.
Long-Term Waste Storage Solutions
Extended shelter-in-place scenarios lasting 30+ days require different disposal strategies. Continuous bucket rotation becomes impractical, so families need methods that handle larger waste volumes.
Designated waste pits represent the most practical long-term solution for households with yard access. Dig a pit at least 200 feet from any water source, well, or spring. The distance prevents groundwater contamination if the pit eventually seeps. Make the pit at least 3 feet deep to prevent animal disturbance.
Line the pit with heavy-duty plastic sheeting to slow seepage and contain waste. Deposit waste in sealed bags rather than loose material, this prevents pathogen spread and makes eventual cleanup easier. Cover deposits with 6 inches of soil after each use to control odor and prevent insect access.
Apartment dwellers and those without yard space must store sealed waste containers in secure locations. Garages, sheds, and exterior storage areas work if temperatures remain moderate. In extremely hot climates, waste decomposition accelerates and creates serious odor issues, sealed storage becomes impractical beyond 2-3 weeks.
Composting toilets offer an alternative for long-term situations. These systems use sawdust, leaves, or other carbon-rich materials to create aerobic decomposition. Finished compost can be safely disposed of or buried. Composting systems require 6-12 months to fully process waste, so they're not practical for immediate crisis situations but become valuable in extended scenarios.
Emergency Water Storage Requirements for Sanitation
Water represents the foundation of all sanitation systems, yet most emergency plans allocate insufficient quantities. The CDC recommends one gallon per person daily for drinking and cooking, but sanitation requires additional water. Most families need 2-3 gallons per person daily during emergencies to maintain basic hygiene while conserving water.
Calculate your household's water needs by multiplying residents by 3 gallons and the anticipated duration. A family of four sheltering in place for 14 days needs at least 168 gallons. Most households store far less, creating water shortages that force unsanitary compromises.
Store water in food-grade containers explicitly designed for potable water. Never use containers that previously held chemicals, pesticides, or non-food products, residual contamination persists even after thorough cleaning. Rotate stored water every six months to prevent stagnation and bacterial growth.
Water purification methods extend limited supplies. Boiling kills pathogens but requires fuel and time. Water purification tablets work quickly and store indefinitely but impart unpleasant taste. Filtration systems remove particulates and some pathogens but don't eliminate viruses. Combine multiple purification methods for redundancy, if one fails, alternatives remain available.
Reserve water specifically for sanitation rather than mixing it with drinking supplies. Mark sanitation water containers clearly to prevent accidental consumption. This separation ensures you maintain minimum hygiene standards even if drinking water becomes critically limited.
Pre-Made vs. DIY Emergency Sanitation Kits
The decision between purchasing pre-assembled kits and building custom systems depends on budget, storage space, and specific household needs. Both approaches have legitimate advantages and genuine limitations. Rather than treating this as a binary choice, most households benefit from understanding the actual cost differences and building a hybrid approach tailored to their financial situation.
Budget-Tier Breakdown: DIY Assembly by Price Point
Building your own emergency sanitation kits for home costs significantly less than purchasing pre-made alternatives, but the actual investment varies dramatically depending on quality and quantity choices. Understanding cost tiers helps families make realistic decisions aligned with their budgets.
Budget Tier 1: Minimal System ($80-120 for family of 4)
- 2 food-grade 5-gallon buckets: $20
- 1 basic toilet seat adapter: $25
- 100 heavy-duty trash bags (13-gallon): $15
- 10 lbs lime powder: $12
- 50 pairs nitrile gloves: $8
- 100 hand sanitizer wipes: $10
- 2 bars soap: $4
- 200 sheets toilet paper (4 rolls): $6
This tier covers absolute essentials for a 7-10 day shelter-in-place scenario. Lime powder replaces enzyme treatments (cheaper, longer shelf life). No water storage included; assumes access to stored drinking water. Suitable for renters or those with severe space constraints.
Budget Tier 2: Standard System ($180-250 for family of 4)
- 4 food-grade 5-gallon buckets: $40
- 2 toilet seat adapters: $50
- 200 heavy-duty trash bags (55-gallon): $35
- 15 lbs enzyme treatment powder: $30
- 15 lbs lime powder: $18
- 100 pairs nitrile gloves: $12
- 200 disinfectant wipes: $18
- 500 sheets toilet paper (10 rolls): $12
- 50 feminine hygiene products: $15
- 50 gallons water storage containers: $35
This tier handles 14-21 days comfortably and includes redundancy (both enzyme and lime treatments). Water storage separates sanitation from drinking supplies. Recommended baseline for most households.
Budget Tier 3: Comprehensive System ($350-500 for family of 4)
- 6 food-grade 5-gallon buckets: $60
- 1 portable camping toilet (20-gallon capacity): $200
- 2 toilet seat adapters: $50
- 300 heavy-duty trash bags (55-gallon): $50
- 25 lbs enzyme treatment powder: $50
- 20 lbs lime powder: $25
- 150 pairs nitrile gloves: $20
- 300 disinfectant wipes: $25
- 1000 sheets toilet paper (20 rolls): $24
- 100 feminine hygiene products: $30
- 100 gallons water storage: $70
- Portable hand-washing station with 5-gallon water jug: $50
This tier supports 30+ days and includes a commercial backup toilet for families prioritizing comfort and psychological resilience. Includes dedicated hand-washing station. Suitable for families with yard space and higher budgets.
Commercial Kit Cost Analysis
Pre-made emergency sanitation kits for home arrive fully assembled with coordinated components. Families unbox the kit and use it immediately without assembly or research. Quality commercial kits from established preparedness retailers cost $300-600 for family-sized systems.
Common commercial kit brands and typical pricing:
- Basic portable toilet kits ($150-250): Include a single 5-gallon portable toilet, chemical treatment packets (typically 6-8 treatments), and minimal hygiene supplies. Suitable as a supplement, not a complete system.
- Mid-range family kits ($350-450): Include bucket toilet system, 20-30 treatment packets, basic hygiene supplies (wipes, gloves, soap), and 50-100 sheets toilet paper. Often lack adequate quantities for 14+ days.
- Premium comprehensive kits ($500-700): Include portable camping toilet, bucket backup system, 50+ treatment packets, extensive hygiene supplies, water storage containers, and hand-washing station. Closest to Tier 3 DIY equivalent.
The hidden cost of commercial kits is ongoing chemical treatment refills. Portable toilet chemical packets cost $15-25 per refill (typically 6-8 treatments per packet). A family of four using a portable toilet exclusively needs 4-6 refills monthly, adding $60-150 annually to maintenance costs. DIY enzyme and lime treatments cost significantly less per use and don't require brand-specific refills.
DIY vs. Pre-Made: True Cost Comparison
| Factor | DIY Tier 2 | Commercial Mid-Range | DIY Tier 3 | Commercial Premium |
|---|---|---|---|---|
| Initial Cost | $180-250 | $350-450 | $350-500 | $500-700 |
| Annual Maintenance | $20-40 | $60-150 | $30-50 | $80-200 |
| 5-Year Total Cost | $280-450 | $650-1,050 | $500-750 | $900-1,700 |
| Customization | High | Low | High | Low |
| Storage Flexibility | High | Fixed | High | Fixed |
| Shelf Life | 3-5 years | 2-3 years | 3-5 years | 2-3 years |
DIY systems cost 40-60% less over five years and offer superior customization. Commercial kits offer convenience and psychological comfort but lock families into specific component choices and ongoing chemical costs.
Hybrid Approach: Optimal for Most Households
The most practical strategy combines DIY bucket systems (primary) with a single portable camping toilet (backup/comfort). This hybrid approach costs $250-350 and provides:
- Primary system redundancy: if bucket system fails, portable toilet remains available
- Psychological resilience: families maintain dignity with a "real" toilet option
- Cost efficiency: avoids expensive chemical refills by using buckets as primary system
- Flexibility: portable toilet can be used for evacuation scenarios
Many families assemble Tier 2 DIY systems initially, then add a single portable camping toilet ($150-250) when budget allows. This staged approach spreads costs over time while maintaining functional sanitation throughout the process.
When to Choose Each Approach
Choose DIY if:
- Budget is under $300 for initial setup
- You have time to research and assemble over 2-3 months
- You want to customize for specific family needs
- You're willing to test the system before emergencies
- You prioritize long-term cost efficiency
Choose Commercial if:
- You need a complete system immediately
- Budget exceeds $500 and convenience is worth the premium
- You lack confidence in DIY assembly
- You prefer professional-grade components and quality assurance
- You want tamper-evident packaging and warranty support
Choose Hybrid if:
- You want cost efficiency with psychological comfort
- You have moderate budget ($250-400) and time flexibility
- You want redundancy and system flexibility
- You're building a long-term preparedness plan
SHTF Prepper Club recommends starting with Tier 2 DIY assembly ($180-250), testing it for 30 days, then adding a portable camping toilet if your family's psychological comfort requires it. This approach captures cost benefits while ensuring your system actually works before real emergencies occur.
Customizing Sanitation Kits for Your Family and Regional Hazards
One-size-fits-all emergency sanitation kits fail because households differ dramatically in composition, location, and anticipated scenarios. A kit designed for a suburban family of four doesn't serve a rural property with well water or an apartment dweller with no yard space.
Family Size and Mobility Considerations
Family composition drives every component decision in emergency sanitation systems. Households with infants require different supplies than those with teenagers or elderly members. A family of six needs triple the supplies of a household with two people.
Calculate your household's baseline needs: number of people multiplied by anticipated duration. Most experts recommend 14-day supplies as a minimum, this covers most common emergencies. Families in hurricane zones or areas prone to extended outages should maintain 30-day supplies.
Mobility requirements fundamentally change kit design. Families planning to evacuate need portable systems that fit in vehicles. This means smaller buckets, compact treatment supplies, and lightweight containers. Families sheltering in place can use larger systems with less concern for portability.
Households with mobility limitations require different considerations. Elderly family members or those with physical disabilities need toilet systems that don't require bending or lifting. Portable camping toilets with higher seats serve these needs better than bucket systems.
Children require specific attention in sanitation planning. Young children often resist alternative toilet systems, creating compliance problems. Involving children in kit assembly and explaining the system before emergencies occur increases acceptance when it matters most. Practice using the system during a planned weekend, this normalizes the experience and identifies problems before real crises.
Regional Disaster-Specific Needs
Geographic location determines which emergencies are most likely and what sanitation challenges they create. Coastal regions face hurricane and flooding scenarios requiring rapid evacuation supplies. Inland areas prone to winter storms need systems that function in freezing temperatures.
Flooding creates unique sanitation challenges because contaminated water makes traditional waste disposal impossible. Families in flood zones need elevated storage for waste containers and supplies that function in damp conditions. Enzyme treatments and lime powder both work in wet environments, but sealed containers become critical to prevent water infiltration.
Winter storms in cold climates require treatment supplies that function below freezing. Enzyme-based treatments become ineffective below 50°F. Families in northern regions should rely primarily on lime powder, which functions in any temperature. Include extra insulation for waste storage containers to maintain minimum functional temperature.
Drought-prone regions face water scarcity that makes sanitation planning more critical. Every gallon of water becomes precious, so waterless waste systems become more attractive. Composting toilets and enzyme treatments that require minimal water serve these regions better than systems demanding water for cleaning.
Wildfire zones require evacuation-focused sanitation kits that fit in vehicles. Portable toilet systems, collapsible buckets, and compact treatment supplies become priorities. Families should practice loading their sanitation kit alongside other emergency supplies to ensure everything fits before actual evacuation.
Research from FEMA regional hazard assessments identifies specific disaster risks for your geographic area. Review your region's hazard profile and customize sanitation supplies accordingly. This targeted approach ensures your kit addresses actual threats rather than hypothetical scenarios.
Maintenance and Rotation Schedule for Sanitation Supplies
Emergency sanitation kits for home require ongoing maintenance to remain effective. Supplies degrade, expire, and become ineffective over time. A kit assembled five years ago and never revisited likely contains unusable components when emergencies actually occur. The difference between a functional system and a failed system during actual crises often comes down to whether maintenance happened on schedule.
Most families fail at maintenance not because they don't understand why it matters, but because they lack a systematic calendar and tracking method. This section provides a concrete maintenance schedule you can implement immediately.
Quarterly Maintenance Calendar (Every 3 Months)
Schedule these dates on your household calendar now:
- First week of January (Winter check)
- First week of April (Spring check)
- First week of July (Summer check)
- First week of October (Fall check)
Set phone reminders one week before each date so you have time to order replacements if needed.
During each quarterly check, complete these tasks (30 minutes):
-
Inspect all treatment supplies for expiration
- Enzyme-based treatments: Replace if manufactured more than 18 months ago
- Lime powder: Check for moisture or clumping (indicates water infiltration). Replace if compromised
- Disinfectant wipes: Replace if expiration date has passed or container has been opened more than 6 months
- Hand sanitizer: Replace if expiration date has passed (typically 2-3 years from manufacture)
-
Check physical condition of containers
- Inspect 5-gallon buckets for cracks or damage
- Verify toilet seat adapters are secure and not cracked
- Check trash bags for tears or brittleness
- Inspect nitrile gloves for brittleness or tears (gloves degrade in heat and sunlight)
-
Verify water storage integrity
- Check water containers for leaks, cracks, or cloudiness
- Smell stored water for any odor (indicates bacterial growth)
- Verify containers are sealed and lids are tight
- Note any water that needs rotation (see water rotation schedule below)
-
Document findings in maintenance log
- Record date of inspection
- List any items that need replacement
- Note any damage or concerns
- Order replacement items immediately
Water Rotation Schedule (Every 6 Months)
Stored water requires specific rotation protocols to prevent stagnation and bacterial growth. Replace stored water every six months, not because it becomes unsafe immediately, but because water quality degrades over time even in sealed containers.
Schedule these dates:
- June 1st (Summer rotation)
- December 1st (Winter rotation)
Water rotation process:
- Use rotated water for garden irrigation, outdoor cleaning, or car washing (don't discard it)
- Refill containers with fresh water
- Label new containers with current date using waterproof marker
- Store in cool, dark location away from direct sunlight
If you maintain 100 gallons of stored water, rotating it twice yearly means you use 200 gallons annually for non-emergency purposes. This creates a sustainable cycle where emergency water is constantly refreshed without waste.
Annual System Test (Once Per Year)
Schedule this date: Second Saturday in September
This isn't pleasant, but it's the only way to identify problems before real emergencies. Set aside a full day (4-6 hours) to actually use your sanitation system.
Annual test procedure:
-
Assemble your complete bucket toilet system in a designated location (garage, shed, or screened area)
-
Use the system for a full day (all family members should participate)
-
Document everything:
- Does the seat adapter fit properly?
- Do treatment supplies control odor effectively?
- Do you have adequate supplies for the day's usage?
- Are gloves, wipes, and other supplies accessible?
- Does the system feel stable and safe?
- What problems did you encounter?
-
Make notes on what needs improvement:
- Do you need more supplies than estimated?
- Are containers positioned awkwardly?
- Is privacy adequate?
- Do family members resist using the system?
-
Adjust your kit based on findings before the next emergency
Families that skip this test often discover critical problems during actual emergencies when stress and panic make problem-solving nearly impossible. A single day of testing prevents catastrophic failures.
Expiration Tracking Spreadsheet
Create a simple spreadsheet to track all expiration dates. This removes guesswork and ensures nothing expires unexpectedly.
Spreadsheet columns:
- Item name
- Quantity
- Purchase date
- Expiration date
- Replacement date (set for 30 days before expiration)
- Notes
Example entries:
| Item | Quantity | Purchase Date | Expiration Date | Replacement Reminder | Notes |
|---|---|---|---|---|---|
| Enzyme treatment powder (20 lbs) | 1 | 2024-03-15 | 2025-09-15 | 2025-08-15 | Store dry, away from heat |
| Disinfectant wipes (200 count) | 2 | 2024-06-01 | 2026-06-01 | 2026-05-01 | Check container seal quarterly |
| Hand sanitizer (16 oz) | 2 | 2024-01-10 | 2026-01-10 | 2025-12-10 | Expires 2 years from purchase |
| Stored water (100 gallons) | 1 | 2024-06-01 | 2024-12-01 | 2024-11-01 | Rotate every 6 months |
| Nitrile gloves (100 pair) | 2 | 2024-04-20 | 2026-04-20 | 2026-03-20 | Replace if brittle or cracked |
Store this spreadsheet in a shared location (Google Sheets, printed copy in your emergency binder, or both). Set calendar reminders for replacement dates so you order supplies before they expire.
Seasonal Adjustments
Different seasons create different storage challenges. Adjust your maintenance approach based on climate.
Summer (Heat & Humidity):
- Check enzyme treatments more frequently (heat degrades them faster)
- Verify water containers are in shade (direct sunlight degrades plastic)
- Inspect gloves for brittleness (heat causes degradation)
- Increase inspection frequency to every 6 weeks instead of quarterly
Winter (Cold & Moisture):
- Verify lime powder hasn't absorbed moisture (cold storage is actually beneficial)
- Check water containers for freezing (if stored outdoors, ensure they won't crack)
- Inspect storage location for water leaks or humidity
- Ensure enzyme treatments are stored above 50°F (they become ineffective in cold)
Spring & Fall:
- Standard quarterly maintenance applies
- Check for pest damage in storage areas
- Verify containers haven't shifted or been disturbed
Family Communication & Documentation
Maintenance only works if all household members know where supplies are stored and when they were last checked.
Create a maintenance binder containing:
- Printed copy of maintenance schedule with upcoming dates highlighted
- Expiration tracking spreadsheet (updated quarterly)
- Maintenance log showing what was checked and when
- System assembly instructions (so anyone can rebuild if needed)
- Contact information for suppliers if emergency replacements are needed
- Photos of your assembled system (helps with rebuilding)
Store this binder in an accessible location where all family members know to find it. Review it together quarterly before each maintenance check.
Maintenance Log Template
Use this template to document every maintenance check:
Date of Inspection: _______________ Inspector Name: _______________
Items Checked:
- Enzyme treatment powder, Expiration: _____ Condition: Good / Replace
- Lime powder, Expiration: _____ Condition: Good / Replace
- Disinfectant wipes, Expiration: _____ Condition: Good / Replace
- Hand sanitizer, Expiration: _____ Condition: Good / Replace
- Nitrile gloves, Expiration: _____ Condition: Good / Replace
- 5-gallon buckets, Condition: Good / Damaged
- Toilet seat adapters, Condition: Good / Damaged
- Trash bags, Condition: Good / Damaged
- Water containers, Condition: Good / Leaking / Cloudy
- Water expiration, Last rotated: _____ Next rotation: _____
Items to Replace:
Problems Identified:
Actions Taken:
Next Inspection Date: _______________
Psychological Preparedness and Sanitation Planning
Most emergency preparedness discussions focus on physical supplies while completely ignoring psychological factors. Yet mental health and emotional resilience determine whether families maintain sanitation standards during actual crises. Families that panic or lose hope abandon sanitation practices and create health disasters.
Psychological preparedness begins with understanding that sanitation system failure is survivable. Humans have managed without modern plumbing for millennia. Your household can too. This mindset shift reduces anxiety and increases confidence when systems actually fail.
Involve all family members in sanitation planning and practice. Children who understand the system and have practiced using it remain calm when emergencies occur. Adults who have tested equipment before crises begin troubleshoot problems rationally rather than panicking.
Normalize conversations about bodily functions and waste management. Families that treat these topics as taboo create shame and resistance when alternative systems become necessary. Open discussion about sanitation needs removes psychological barriers to compliance.
Plan for privacy and dignity in your sanitation system. Families that maintain basic privacy and dignity during emergencies manage stress far better than those forced into undignified situations. This might mean screening off your bucket toilet with a curtain or designating specific times for bathroom use. These small accommodations dramatically improve psychological outcomes.
Consider mental health support for family members who struggle with alternative sanitation systems. Some people experience genuine distress when forced to use non-traditional toilets. Acknowledging these feelings and planning coping strategies prevents them from becoming crisis points during actual emergencies.
Social support networks strengthen psychological resilience. Families who know their neighbors and have discussed emergency plans together manage crises better than isolated households. Community sanitation planning, coordinating supplies and systems across multiple households, creates redundancy and mutual support.
Emergency sanitation systems aren't glamorous, but they're absolutely essential. Families that assemble and maintain proper emergency sanitation kits for home avoid health crises that kill people in disaster scenarios far more often than the initial emergency itself. SHTF Prepper Club provides expert-vetted sanitation components and comprehensive assembly guides that simplify the process. Start with a basic bucket toilet system and treatment supplies, this $150-200 investment protects your family's health during extended emergencies. Add to your system gradually as budget allows, and test it annually to ensure everything functions when you need it most.
Frequently Asked Questions
What should be in an emergency sanitation kit?
A comprehensive emergency sanitation kit should include toilet paper, wet wipes, hand sanitizer, garbage bags, disinfectant spray, personal hygiene items like feminine products and adult diapers if needed, a bucket toilet system or portable camping toilet, and waste disposal supplies. Include enough supplies for your family size multiplied by at least 72 hours. Add prescription medications and any specialized items for family members with unique sanitation needs. Store everything in a waterproof, easily accessible container.
How do you dispose of human waste in an emergency when sewage systems fail?
Proper disposal of human waste in an emergency involves containing waste in sealed bags within a covered bucket system, then storing sealed waste in a designated outdoor location away from water sources and living areas. Use heavy-duty garbage bags and secure them tightly to prevent odors and contamination. For longer emergencies, dig a waste pit at least 200 feet from water supplies and bury sealed bags. Never dispose of waste in storm drains or areas where it could contaminate groundwater. Follow local health department guidance if available.
How long do emergency sanitation supplies last?
Most emergency sanitation supplies have shelf lives ranging from 2 to 5 years, though basic items like toilet paper and bags can last longer if stored in dry conditions. Wet wipes and hand sanitizers typically last 2-3 years before losing effectiveness. Check expiration dates on all products, especially medications and first aid items. Establish a rotation schedule to replace supplies annually or when expiration dates approach. Store items in cool, dry locations away from direct sunlight to maximize shelf life.
Is a bucket toilet necessary for emergency preparedness with sanitation kits?
A bucket toilet system is highly recommended for emergency preparedness, especially during prolonged power outages or water supply disruptions when traditional plumbing fails. A simple 5-gallon bucket toilet costs very little and provides a sanitary alternative to unsafe outdoor disposal. Even if you have other backup options, a bucket toilet serves as a reliable backup-to-your-backup. Include heavy-duty liners, absorbent materials, and disinfectant supplies to maintain hygiene and minimize health risks during emergencies.
What are the best emergency hygiene supplies for a family sanitation kit?
Essential best emergency hygiene supplies include toilet paper, hand sanitizer, wet wipes, soap, disinfectant spray, personal hygiene products, garbage bags, and latex gloves. Add toothpaste, toothbrushes, and feminine hygiene products tailored to your family's needs. Include disinfectant wipes to clean surfaces and prevent disease transmission. For families with infants, add diapers and diaper wipes. Store items in waterproof containers and ensure everyone knows their location. Rotate supplies regularly to maintain effectiveness.
How much water do I need for emergency sanitation and hygiene?
Beyond drinking water, emergency water storage requirements for sanitation recommend one gallon per person per day for hygiene and sanitation purposes. For a family of four sheltering for 72 hours, store at least 12 gallons dedicated to washing, toilet flushing alternatives, and cleaning. Store water in food-grade containers away from sunlight. Include water purification tablets or filters for long-term emergencies. Rotate stored water every six months to maintain freshness and prevent contamination.
Should I build a DIY emergency sanitation kit or buy a pre-made one?
DIY emergency sanitation kits offer cost savings and customization to your family's specific needs, while pre-made kits provide convenience and expert-vetted components. Budget-conscious families benefit from assembling their own kits using items from local stores, though this requires research and planning. Pre-made kits eliminate guesswork and often include items you might overlook. Consider a hybrid approach: purchase a quality base kit and customize it with family-specific supplies. Check current pricing and availability on SHTF Prepper Club's website for options that fit your budget.
This article was written using GrandRanker