
Table of Contents
- Why Emergency Preparedness for Small Children Matters
- Creating a Family Emergency Plan with Young Children
- Building an Emergency Kit Checklist for Toddlers
- How to Talk to Children About Disasters
- Developing a Family Emergency Communication Plan Template
- Emergency Preparedness Activities for Preschoolers
- Coordinating with Schools and Daycare Providers
- Budget-Friendly Preparedness for Families
Last Updated: June 27, 2026
When disaster strikes, families with young children face unique challenges that standard preparedness guides overlook. Emergency preparedness for small children requires strategies tailored to their developmental needs, physical vulnerabilities, and emotional resilience. This guide covers creating a household disaster plan, assembling emergency supplies, and helping your children respond to emergencies with confidence.
Children separated from caregivers during crises experience significant trauma, and those without proper nutrition, hydration, or medical supplies face immediate health risks. Below, we'll show you how to create a family emergency plan, build an emergency kit for toddlers, and develop communication strategies that keep everyone safer.
Why Emergency Preparedness for Small Children Matters
Children under five cannot advocate for their own needs or understand abstract danger. They depend entirely on caregivers for survival, making their preparedness non-negotiable. A household with a prepared emergency plan and stocked supplies can shelter safely in place and maintain nutrition, hydration, and medical care for at least 72 hours without external help.
Families without this preparation face preventable suffering: dehydrated infants, missed medication doses, lost medical records, or separation from children during evacuation. Beyond physical survival, children who understand basic emergency concepts experience less psychological distress and feel more secure when caregivers demonstrate competence.
Creating a Family Emergency Plan with Young Children
A family emergency plan is your household's playbook for disaster. Start by identifying all household members and their typical daily locations. Where are your children during weekdays? Each location needs its own evacuation route and reunification plan. Write down phone numbers for each facility and confirm their emergency procedures.
Choose two meeting points: one near your home for immediate evacuation, one outside your neighborhood for larger-scale disasters. Use specific landmarks your children can recognize. For toddlers, use "the big red mailbox" or "the park with the blue slide" rather than street addresses.
Document your children's medical information: allergies, medications, dietary restrictions, and special health care needs. Store this in a waterproof container and keep copies with emergency contacts. Include photos of each child with identifying information in case of separation.
Identifying Household Hazards and Evacuation Routes
Walk through your home and identify potential hazards threatening young children: heavy furniture that could topple during earthquakes, unsecured water heaters, gas connections, and toxic chemicals stored at child height. Create a simple evacuation map showing two exit routes from each room using visual aids like stick-figure diagrams. Practice the routes monthly so children know them instinctively.
Identify which evacuation routes work for children with mobility challenges or special needs. Document these accommodations so any caregiver understands the safest path.
Shelter-in-Place Strategies for Families
Many emergencies require staying home rather than evacuating. Identify your shelter-in-place room: ideally an interior room without windows, on the lowest floor. Stock it with emergency supplies including bottled water, non-perishable food, first aid supplies, flashlights, batteries, and medications. Include comfort items for children: books, toys, blankets, and stuffed animals that reduce anxiety.
Practice shelter-in-place drills by spending 30 minutes in your designated room quarterly. Make it low-pressure: read books, play games, or simply sit together. Children who practice feel less frightened when actual shelter-in-place becomes necessary.
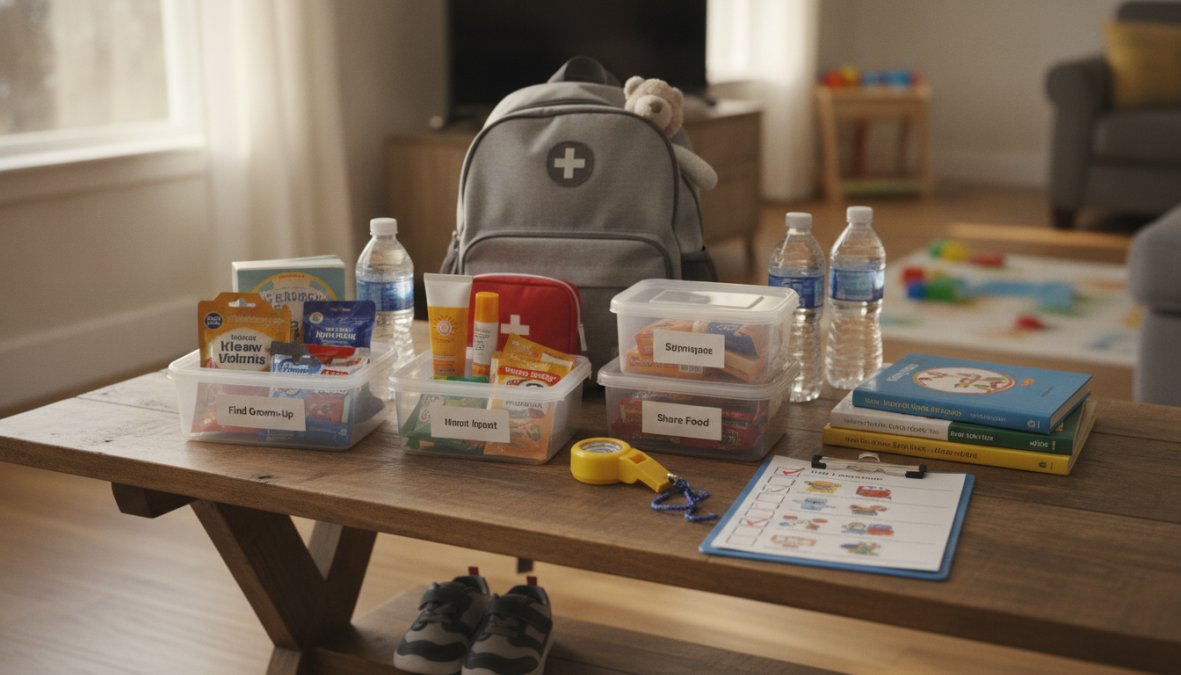
Building an Emergency Kit Checklist for Toddlers
An emergency kit for toddlers differs significantly from adult preparedness supplies. Toddlers have higher caloric needs relative to body weight and require specific nutrition for development. Your emergency kit must include supplies for at least 72 hours without resupply. For families with infants, extend this to 14 days if possible, as formula and diapers become critical shortages during major disasters.
Essential Supplies: Food, Water, and First Aid
Store one gallon of bottled water per person per day for drinking and hygiene. For a family of four with two toddlers, maintain at least 12 gallons rotated every six months. Toddlers dehydrate quickly; extra water prevents medical emergencies.
Non-perishable food for toddlers means shelf-stable options they actually eat: peanut butter, crackers, dried fruit, canned vegetables, applesauce pouches, and pasta. Avoid foods toddlers haven't tried before, as stress and new foods cause digestive upset. Pack comfort foods your children request.
First aid supplies must include items specific to young children: pediatric pain relievers in liquid form, antibiotic ointment, small bandages, tweezers for splinter removal, thermometer, saline nasal drops, and anti-diarrheal medication formulated for toddlers. Include any prescription medications with 30-day supplies in original labeled containers. Add your pediatrician's contact information and emergency protocols for your children's specific health conditions.
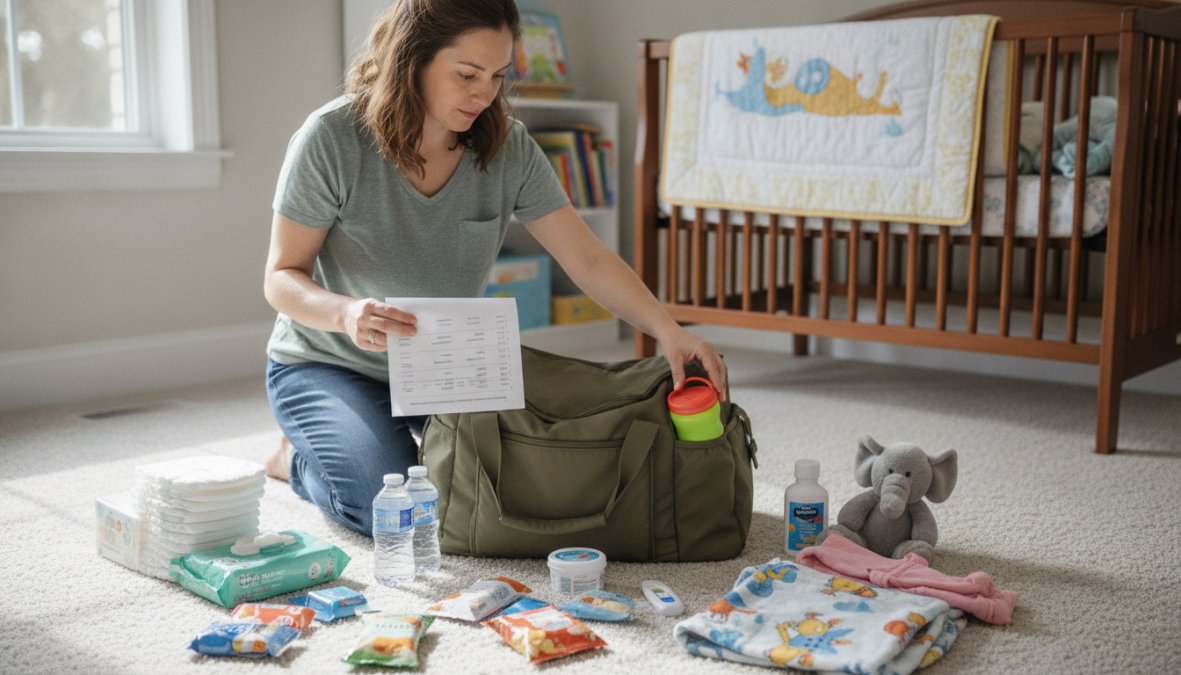
Infant and Toddler-Specific Needs
Infants require formula, bottles, and water. If your infant uses formula, store 30 days of powdered formula in airtight containers along with bottled water for mixing. Powdered formula lasts longer than liquid and requires less storage space.
Store 200-300 diapers in sealed bags to prevent odor and contamination. Include diaper cream and any medications for diaper rash. Pack comfort items: pacifiers, teething toys, and a few favorite books or toys. Include a change of clothes in multiple sizes and socks.
How to Talk to Children About Disasters
Young children's brains cannot process abstract danger. Your explanation must match their developmental stage and avoid language that creates anxiety.
For children under three, keep explanations extremely simple and action-focused: "Sometimes it rains very hard. We stay inside our safe room. You stay with me." Toddlers need reassurance that caregivers remain present and in control.
For preschoolers (ages 3-5), use concrete examples they've experienced: "Remember when the power went out and we used flashlights? We practiced that so we know what to do."
Age-Appropriate Explanations and Reassurance
Avoid words like "catastrophe" or "devastation." Use simple language: "Sometimes nature is powerful. Heavy rain, strong wind, or shaking ground can happen. Our family knows what to do to stay safe."
Explain your family's plan using their perspective: "If the ground shakes, we go to the kitchen (your shelter-in-place room). We have water, food, and toys there. You stay with me the whole time."
Practice emergency drills as games, not scary scenarios. During a fire drill, make it a race: "Let's practice getting outside fast, ready, set, go!" During shelter-in-place practice, frame it as quiet time together with special activities.
Answer questions honestly but simply. If a child asks, "Will a hurricane hurt us?" respond: "Hurricanes are very strong wind and rain. Our home is built to keep us safe. We have a plan and supplies. You'll be with me."
Psychological First Aid for Children After Emergencies
After an actual emergency, children show stress responses: regression, clinginess, sleep disruption, or behavioral changes. These are normal developmental responses, not signs of permanent trauma.
Maintain routines as much as possible. Consistent meal times, sleep schedules, and familiar activities help children's nervous systems regulate. Validate their emotions without amplifying fear: "You seem scared. That's okay. Scary things happened, and your feelings make sense. I'm here with you, and we're safe now."
Avoid forcing children to discuss the emergency. Some children process through play and drawing; others need quiet time. Follow their lead on when and how to talk about what happened.
Developing a Family Emergency Communication Plan Template
During major emergencies, local phone networks often overload. Text messages transmit when calls cannot. Your family communication plan must include multiple methods and out-of-area contacts who can relay messages.
Choose an out-of-area contact, a relative or friend outside your region who can receive calls and texts when local networks fail. Give each family member this person's number. During emergencies, family members call or text the out-of-area contact to report their location and status.
Create a simple written communication plan showing:
- Out-of-area contact name and phone number
- Each family member's cell phone number
- Work and school contact information
- Where to meet if separated
Laminate this plan and keep copies in wallets, vehicles, and your emergency kit.
Emergency Contacts and Out-of-Area Meeting Points
Teach young children to memorize a phone number, ideally the out-of-area contact's number. Practice reciting it weekly until they know it automatically. For children too young to memorize numbers, write your phone number and out-of-area contact information on a card and keep it in their pocket or backpack.
Establish a specific out-of-area meeting point, a relative's home or a landmark outside your neighborhood. Tell children: "If we get separated during an emergency, go to Grandma's house" or "Meet at the fire station on Main Street." Practice the route so children recognize it visually.
| Element | Details | Purpose |
|---|---|---|
| Out-of-area contact | Name, phone number, relationship | Central relay point for family info |
| Meeting point | Specific address or landmark | Reunification if separated |
| Phone numbers | Each family member memorized | Communication backup |
| Written plan | Laminated cards in wallets/packs | Reference if phones unavailable |
Emergency Preparedness Activities for Preschoolers
Young children learn through play and repetition. Regular emergency drills and preparedness activities build competence and reduce anxiety. These activities should feel like games, not scary training.
Making Drills Fun and Engaging
Turn fire drills into races: "Let's see how fast we can get outside safely. Ready, set, go!" Celebrate completion: "You did it! You got outside so fast!"
During shelter-in-place practice, set up the emergency room like a fort or camping adventure. Bring blankets, pillows, and toys. Spend 30 minutes reading books or playing games. This normalizes the space and makes it feel safe.
Practice with stuffed animals. Have children help a teddy bear pack an emergency backpack or practice the evacuation route. Create a "disaster preparedness" picture book showing your family's plan with simple stick figures and evacuation routes. Read it monthly so children internalize the plan visually.
Play "what if" games during calm moments: "What if the power goes out? What would we do?" Let children answer and praise correct responses.
Coordinating with Schools and Daycare Providers
Your child's school or daycare is their second home during weekdays. Request copies of the facility's emergency procedures for fire, shelter-in-place, and evacuation scenarios. Ask how the facility will reunify children with parents during emergencies and confirm your contact information is current.
Discuss your child's special needs with school staff: food allergies, medications, behavioral responses to stress, or mobility challenges. Ensure staff know your family's out-of-area contact and meeting point. Provide copies of your child's medical information, emergency medications, and any special health care needs. Establish a communication protocol: How will the school contact you? When? What happens if you cannot be reached?
Budget-Friendly Preparedness for Families
Quality emergency preparedness doesn't require expensive gear. Strategic, incremental purchasing builds a complete emergency kit without financial strain.
Start with water and non-perishable food. Buy bottled water weekly and rotate it into storage. Purchase one shelf-stable food item per shopping trip. Over three months, you'll have substantial supplies with minimal budget impact.
Collect free items: ask your pediatrician for extra bandages, antibiotic ointment samples, or thermometers. Request old blankets from family members. Dollar stores offer flashlights, batteries, first aid supplies, and storage containers at lower prices than supermarkets.
Rotate supplies by using them. Eat canned goods from your emergency kit in regular meals and replace them. Medications and formula must be rotated before expiration. Create your emergency kit in stages: Month one: water and non-perishable food. Month two: first aid supplies and medications. Month three: comfort items and toys.
Practical Emergency Preparedness Summary
| Step | Timeline | Frequency | Impact |
|---|---|---|---|
| Create written family plan | Week 1 | Review quarterly | Clear procedures for all scenarios |
| Assemble 72-hour emergency kit | Weeks 2-4 | Rotate supplies monthly | Survival needs met without resupply |
| Practice evacuation routes | Month 2 | Monthly drills | Children know exits instinctively |
| Establish communication contacts | Week 1 | Update annually | Family can reunify during emergencies |
| Teach children basic concepts | Ongoing | Monthly activities | Children understand and cooperate |
| Coordinate with schools/daycare | Month 1 | Annually | Consistent emergency response across settings |
Final Thoughts
Emergency preparedness for small children is fundamentally about competence and presence. Children feel safe when caregivers demonstrate they've planned for emergencies and remain calm during crises. This preparation protects their physical survival and emotional resilience.
Start today with one action: store bottled water or purchase non-perishable food your children eat. Build from there. Within three months, your family will have a written plan, emergency supplies, practiced drills, and communication protocols that keep your children genuinely safer.
According to the American Red Cross guide to family preparedness, families that practice emergency plans together experience significantly better outcomes during actual crises, children follow instructions more reliably, and adults make faster, clearer decisions.
Frequently Asked Questions
What should be included in an emergency kit checklist for toddlers?
An emergency kit for toddlers must include non-perishable food appropriate for their age, bottled water, first aid supplies, medications, diapers, wipes, comfort items, and a change of clothes. Include age-appropriate snacks like pouches and crackers, infant formula if needed, and any special medical equipment. Store items in a waterproof, easily accessible container and rotate supplies every six months to ensure freshness and functionality.
How do I explain emergencies to a small child without causing fear?
Use simple, honest language appropriate to their age. Avoid graphic details but don't minimize the situation. Focus on what your family will do together and how you'll keep them safe. Practice emergency drills regularly so they feel prepared and confident. Emphasize that emergencies are rare and that having a plan helps everyone stay calm. Reassure them that you'll be together and that grown-ups know how to help.
What makes a family emergency communication plan effective for young children?
An effective emergency communication plan includes designated emergency contacts, an out-of-area meeting point, and a way for family members to check in. For small children, keep instructions simple and practice regularly. Include school and daycare contact information, and ensure caregivers know the plan. Create a laminated card with key information and emergency contacts that children can carry or keep at school, updated annually.
How often should families practice emergency preparedness activities with preschoolers?
Practice household disaster drills at least twice yearly, once every six months is ideal. Keep drills short, positive, and age-appropriate to maintain engagement. Make preparedness activities fun through games, songs, or role-play scenarios. Regular practice builds muscle memory and confidence, helping children respond calmly during actual emergencies. Vary drill types to cover different scenarios like shelter-in-place, evacuation, and meeting point procedures.
Additional Resources:
- [EXTERNAL_LINK: FEMA's guide to family emergency planning | ready.gov]
- [EXTERNAL_LINK: CDC information on emergency preparedness for families with children | cdc.gov]
- [EXTERNAL_LINK: National Center for Missing and Exploited Children identification resources | missingkids.org]
This article was written using GrandRanker